Blog Content

3
Jun
2026
When we talk about flashing bottom of siding, we aren't just talking about a piece of metal. We are talking about the "stalwart guardian" of your home's structural integrity. In the coastal environments of Long Island and Queens, where wind-driven rain is a regular occurrence, the base of your wall is a primary target for moisture.
Flashing serves as a mechanical bridge. It takes water that has managed to get behind your siding (which is more common than you’d think) and directs it safely out and away from the vulnerable wooden sheathing and framing of your house. Without this transition, water pools at the foundation line, leading to rot, mold, and expensive structural repairs. Learn more about our professional siding installation services in Long Island and Queens.
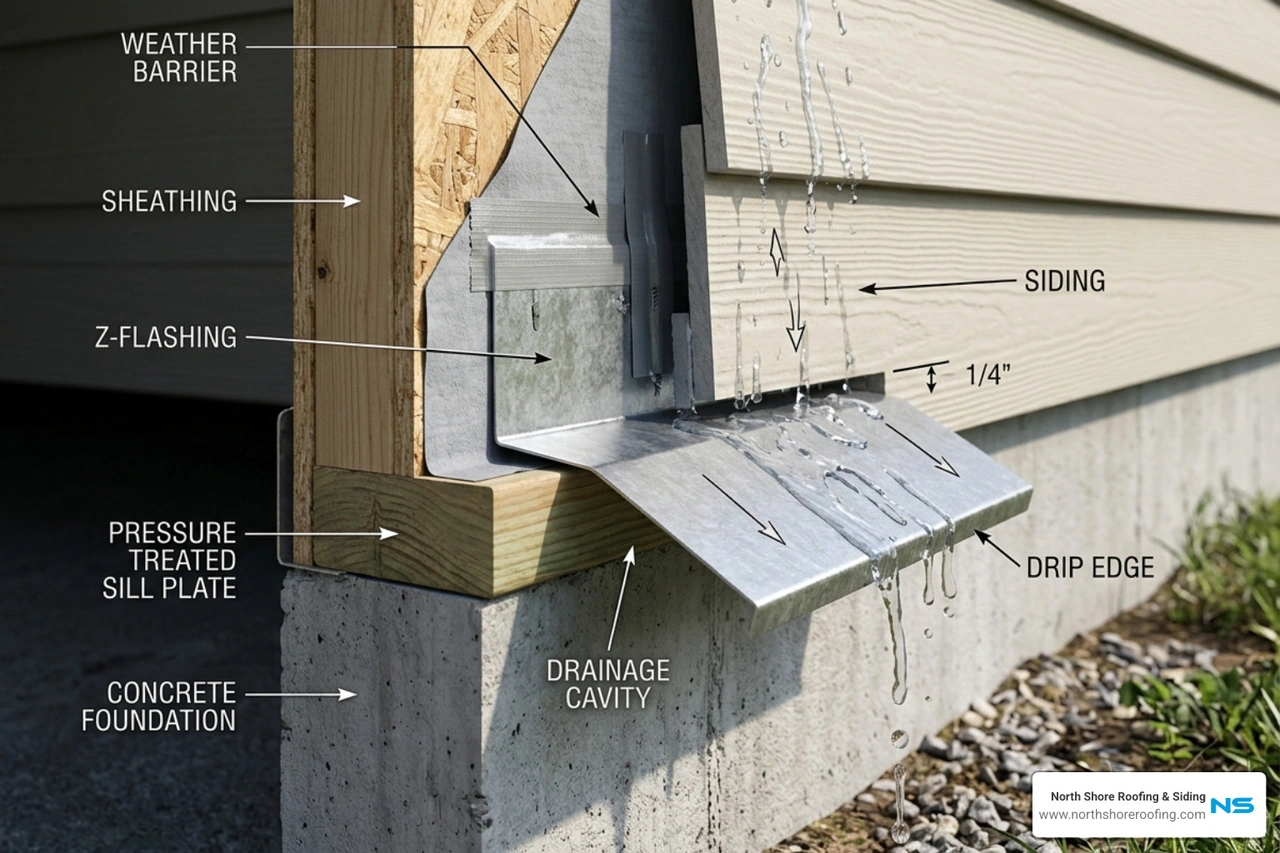
Z-flashing gets its name from its profile, which looks like a jagged "Z." It is most commonly used over horizontal trim boards, such as a water table or a band board that separates the first and second floors.
According to LP Building Solutions, Z-flashing is required over all horizontal wood trim pieces. The "upper leg" of this flashing must be at least 4 inches tall to ensure that even during a heavy Bayside nor'easter, water cannot be blown upward and over the top of the metal. If your stock flashing doesn't have a 4-inch leg, we often supplement it with high-quality flashing tape to meet these rigorous standards.
In modern construction, we don't expect siding to be 100% waterproof. Instead, we build a "drainage plane." This consists of a weather-resistive barrier (WRB), like house wrap, and the flashing.
Proper base flashing for siding ensures that any water hitting the WRB flows down by gravity and is kicked out over the foundation by the flashing's drip edge. This "shingle-style" layering—where the top layer always overlaps the bottom—is the golden rule of waterproofing. In towns like Manhasset and Port Washington, where homes often feature complex architectural details, maintaining this continuous plane is what separates a quality installation from a future leak.
Choosing the right material for your flashing bottom of siding is vital in April 2026. Long Island's salt air is notoriously corrosive, meaning the "cheap" option often fails within a decade.
We generally recommend three main types of materials for our clients in Queens and Nassau County:
For those interested in specific siding types, you can learn more about our Vinyl Siding Installation Service NY or our specialized Siding options.
The International Residential Code (IRC) and industry best practices are very specific about where your siding should end:

At North Shore Roofing & Siding, we believe that the details you can’t see are the most important. Integrating the flashing bottom of siding with your house wrap requires a meticulous "shingling" technique.
One of the most common mistakes we see in DIY or "budget" installs is the lack of a drainage gap. You must maintain a 3/8-inch gap between the bottom of the siding and the horizontal surface of the flashing. This gap allows moisture to escape and prevents water from being "sucked" up into the siding material through capillary action.
We often use a scrap piece of 3/8-inch siding as a gauge during installation to ensure this gap is uniform across the entire length of the wall. This is a standard practice for Siding Installation Services NYC.

Different siding materials require different flashing "personalities." Whether you live in a luxury estate in Manhasset or a multi-family unit in Flushing, the material dictates the method.
In areas like Locust Valley or Bayside, many homes have beautiful stone patios or concrete stairs that butt right up against the house. These are high-risk areas. We often use fluid-applied flashing here because it can conform to the irregular shapes of masonry, creating a watertight seal where metal flashing might leave gaps.
If you see a "handyman" reaching for a caulk gun at the bottom of your siding, stop them!
The most common mistake is caulking the 3/8-inch drainage gap. This effectively turns your siding into a bucket, trapping water inside the wall. Look for these warning signs of flashing failure:
If you have Cedar Siding Installation Service NY, these signs are even more critical, as cedar can rot quickly if it sits in standing water.
Many older homes in Queens and Long Island were built before modern drainage plane standards. Retrofitting flashing bottom of siding is a delicate process:
Absolutely not. Caulking the 3/8-inch gap at the bottom of your siding is one of the fastest ways to destroy your home's walls. This gap is designed to be a "weep" point. If you seal it, moisture that naturally gets behind the siding has nowhere to go. It will sit against your sheathing, causing rot, mold, and attracting wood-destroying insects.
As of April 2026, we recommend heavy-gauge galvanized steel or thick aluminum with a Kynar or factory-baked coating. These materials are tough enough to withstand the occasional "ding" from a lawnmower or weed whacker and are chemically treated to resist the salt air common in Port Washington and Bayside. For maximum longevity, stainless steel or copper are the ultimate choices, though they come at a higher price point.
Check your basement or crawlspace first. If you see water stains on the interior of the foundation wall near the top, water is likely bypassing the flashing. On the outside, look for "rust streaks" coming from behind the siding or trim boards that feel "spongy" to the touch. If your paint is bubbling only at the very bottom of the wall, that’s a classic sign of water being trapped by poor flashing.
At North Shore Roofing & Siding, we’ve seen the damage that a missing or poorly installed flashing bottom of siding can do to a beautiful Long Island home. From the historic estates of Manhasset to the bustling neighborhoods of Flushing, the physics of water remains the same: it always finds the path of least resistance.
Our team of licensed and certified professionals treats every installation with the precision it deserves. We don't just "slap on" siding; we build a comprehensive water management system designed to protect your investment for decades. With honest pricing and a commitment to exceeding expectations, we are proud to be the trusted choice for siding and roofing in Queens and Nassau County.
Don't let a small detail like flashing turn into a massive repair bill. If you're worried about your home's exterior or are planning a renovation, More info about siding installation services is just a click away. Let us help you keep your home dry, safe, and beautiful.

Copyright 2022 North Shore Roofing & Siding | All Rights Reserved | Sitemap | Website by Plumb Development a Digital Marketing Agency

